Showing posts with label embroidery. Show all posts

Friday, March 23, 2018

#anAWWyear - March 1948: Craft

At the end of my last post, I said that the fashion would be continuing this month, and that is because  March 13 1948 was a Special Knitting Issue. 

To start, let us look at the outfit on the cover of this issue, because I'm going to confess that 1940s would not have been my first guess for the decade of this outfit. This could easily pass for several later decades, and I love having the reminder of what really casual outfits could look like. This sweater is the 'Swagger Sport Shirt' by Pierre Balmain, who we are told is "famous in Paris for his casual sports clothes". 
Outfit on the cover
 Australian Women's Weekly, March 13 1948 
It is also a good example of how colour and styling can change one's opinion - the same sweater, styled differently, and in a black and white photograph, has far less impact and I would have passed straight by it. 
Believe it or not, the same sweater as above
Australian Women's Weekly, March 13 1948, p 37
There are instructions for about ten cardigans and sweaters in this issue, several of which are quite standard. I like this checkerboard design, although wouldn't wear it myself.  Of note, the 'New Yorker' twin set, shown here in the yellow top and rust coloured cardigan over it in the (the middle and lowest photos on the right hand side) is designed for the "not-so-slim" and has a bust measurement of 42", which while still terribly inadequate for me, is unusually large for the free patterns that tend to be in vintage magazines. 

Just some of the knit patterns in this issue
Australian Women's Weekly, March 13 1948, p 9

There was no craft I actually tried this month - partially because I've been having a renewed attack on unfinished projects in my stash, and partially because nothing really appealed. There was one crochet project, this unusual purse with a cord decoration, but said decoration was a little too snake like for me (I have a phobia) so I'd never include it in my collection.

Australian Women's Weekly, March 6 1948, p 37

There was also instructions for this embroidered cushion, but I suspect if I made another cushion my husband might complain. We have... quite a few already.

Australian Women's Weekly, March 20 1948, p 36
I've actually been surprised by how many issues don't have any craft projects. If I get the time, I might see if there is a seasonal pattern to when they have them. Or maybe the editors were well aware that their 1948 readers had a limited amount of time!

Tuesday, February 13, 2018

#anAWWyear - February 1948: Fashion

Firstly, an apology for the break in posting. I had a struggle getting ready for Christmas, so there went December. After Christmas I had a large work contract to squeeze in before mid-January, the computer was having major issues (and we have since bought a new one, a decision we should have made months ago), and I having a down patch with my health related to my chronic illness. So there went January.  

Jumping back into my #anAWWyear with February, I'm starting as usual with a look over the fashion shown this month.

I was having a conversation just this week with my sister about tartans and plaids and how much we liked them yet didn't have them in our wardrobes, so these two looks - one from an advertisement, one from a feature on film stars - naturally caught my eye. The pairing of the solid top with large-scale plaid skirt works very well, and I also like the slightly more muted brown/greens of these outfits than the stronger blues/blacks/reds of many such prints I see in reproduction vintage skirts.

An Australian Wool Board advertisement.
Australian Women's Weekly, Feb 14 1948, p 14. 

The lovely Rita Hayworth.
Australian Women's Weekly, Feb 21 1948, p 25.

I don't know who was doing the Vicars Wool fashion sketches in this era - they are signed with what appears to be the initials 'R H' -  but this is yet another one of their drawings which is making me sigh wistfully for the sort of life where I wear such chic outfits. 

That colour!
Australian Women's Weekly, Feb 14 1948, p 6.

I don't usually include an entire page from the magazine, but this feature on the 'Versatile Skirt' was worth it. While I've read plenty of advice about combining pieces to make different outfits in vintage papers, they are rarely illustrated in this way. I particularly like that it isn't an obvious 'basic' skirt either, made up on this slightly green yellow colour - I feel that is more effective a display than a navy or black skirt would have been. 

One skirt in many different outfits.
Australian Women's Weekly, Feb 21 1948, p 11. 

 The final two selections I've chosen this month are embellishments.  A dress from the Fashion Pattern service has lace trimming its off-the-shoulder neckline, and while neither are ideas I usually like something about this is appealing to me right now. Possibly the squared off ends pinned in front?

This ballerina dress takes 7 yds of fabric for the full-length option.
Australian Women's Weekly, Feb 28 1948, p 39.

This feature on beaded embroidery as decoration on clothes has some very nice examples - the embellished over-sized cuffs on the green blouse in the background are striking.
Australian Women's Weekly, Feb 7 1948, p 11. 

A good leap back in, and I'm definitely adding a plaid or tartan skirt to my winter wardrobe wish list!

Tuesday, October 31, 2017

#anAWWyear - October 1947: Craft

October 1947 was a bleak month on the craft front as well - there was this rather neat knitted sweater pattern, sadly a bit beyond my knitting skills, but nothing else to actually make. 

Knit sweater, described as "a smart, useful adjunct to your summer wardrobe" .
Australian Women's Weekly, Oct 4 1947, p 48.


In the same issue there was a short article about the colour and design classes being run at the N.S.W. Society of Arts and Crafts studios, which I enjoyed especially for the photographs run alongside the article. 
Picture of students at work in the design classes.
Australian Women's Weekly, Oct 4 1947, p57

My eye was also caught by this great advertisement for Semco printed designs, which gives some lovely examples of the types of designs which were being sold that year. 

Semco advertisement
Australian Women's Weekly, Oct 4 1947, p 47.
I own some vintage Semco designs, for hand embroidery. I've shown them off on instagram but not here on the blog. The designs are... if not outright racist, then at least designs which embrace pejorative cultural stereotypes.
Semco design, "Mexican". 

Semco design for a cheval set, "Romany"
I find "Romany" less distasteful, because at least it is trying to evoke a more romantic and pastoral image. The embroidery in the above pictures was done before these two came into my collection, and I've dithered about whether I would actually complete them.
I decided to finish "Romany" for my craft this month, and I plan to use the pieces to decorate an apron - using the two smaller ones as pockets on the skirt and the longer one as or across the bodice piece.

I've finished the embroidery on the two smaller pieces and have done the majority of the background embroidery on the larger piece - only the wagon and the woman to complete.
The two smaller pieces will make generous apron pockets. 
Mostly done. 
Once I complete the whole apron, I'll show it off here! I shall call my cultural stereotype apron.

Friday, April 7, 2017

A busy making time

I have been so slack about blogging, but like many others I've been busy making things.  I blame the New Year and resolutions involving using up my stash and increasing my sewn wardrobe. I have even joined a Facebook stashbusting group to keep track of how much fabric I use during the year. (So far: sewn 9 metres and bought 2.5 metres)

This post is really going to be a round up of selected makes from the last few months

A baby sunhat in cute spotted cotton
 This adorable sunhat was a gift for a friend with a young baby. I'd forgotten (even in the scant few years since my boy was that small) just how little fabric you need for baby items. The hat was made entirely from a single fat quarter. And that is with a fully lined crowned.

Zinnia hat, from a 1962 Australian Women's Weekly pattern

I've been crocheting some 1960s hats from patterns from the Australian Women's Weekly. Above is a 'zinnia hat' - the original was yellow with red flowers and I've made it in a slightly more subdued fawn and burgundy colour scheme. Below is the charmingly quirky 'field flower hat' which I've made in very close to the colours suggested in the original. I may redo the pompoms on this one, as I think I'd like them to be fuller. Both of these hats will be listed in my etsy shop soon. 

Field flower hat
Close up of the field flower hat 

 Several years ago, I treated myself to a 'I've finally finished the PhD present' and went to a ten day embroidery convention run by Koala Conventions. One of the two-day courses I did was on Mountmellick work and I did a beautiful design. Well I have finally made it up into the bolster cushion it was designed to be!

The finished Mountmellick bolster. 

I also, as part of both stashbusting and increasing my 'me made' wardrobe, made a kimono style dressing gown, decorated with lace I got for a ridiculously low sum at a garage sale. The pattern isn't a true kimono, although the sleeves are very close, and it is from a BurdaStyle magazine Plus Size special (E030, for anyone who might want to look, although I've checked and this isn't available online). It really needs an iron, but what doesn't?

Dressing gown. 
Close up of sleeve under construction - and the amazing lace!

 A lot of my crafting and blogging time has been curtailed by actual paid work now that my son is at preschool two days a week. Still, actual paid work has funded the purchase of some clothing patterns that I really, really wanted, so I hope to be blogging about those makes soon.  I'm also having some bad days on my medications, which eats into the time I have too.

Wednesday, December 23, 2015

The perils of finishing

#Finish It Friday has got me pondering why I'm so bad at finishing projects.

One of the problems I've found over the past few years with embroidery is that all the fun parts are at the start. I have a great time stitching, but then I'm left with a cool embroidery on a piece of fabric which I still need to turn into something. And planning and executing that is less engaging... so into the pine chest it goes.

Lately I've tried to complete some of those packed away projects to give as gifts or to use.  But they aren't always solutions I can keep using. I thought I'd go through some of the good and bad bits of these finishing techniques.

Frames
Always a traditional choice, I framed a tree and butterfly piece for a gift exchange.
This was a free kit with a cross-stitch magazine, and I feel that painting the frame to match makes it look nicer. Although clearly I needed to iron it more.

Pros:
  • Huge variety of frames available, and can always paint cheap wooden ones to match anything.
  • Only requires a small amount of extra work (lacing, etc) unless as mentioned also changing frame.
Cons:
  • Traditional.
  • Recipient has to find place to display frame.
  • Not very useful apart from the aesthetic lift.
Boxes
I used a piece of stumpwork I completed at a Koala Conventions class in the lid of a wooden box to make a special present for my grandmother last Christmas.
As you can see, I also need to start photographing finished gifts before I give them. This photograph was taken on the day by my brother-in-law and I had to request a copy.

Pros:
  • Looks beautiful and professional
  • Only requires a small amount of extra work (lacing, etc).
  • A potentially useful storage box.
Cons:
  • To get a box worthy of the embroidery requires online ordering for many of us and it isn't cheap.
  • Can really only be used once per recipient.
Christmas tree ornaments
Over the years I've turned many small bits of cross-stitch into ornaments for people. Naturally I don't have any photographs. That would be too easy.

Pros:
  • You can repeat this for the same recipient in different years - no one can have too many ornaments.
  • The finished work will be on display.
Cons:
  • Only works for items that can be slanted as seasonal, holiday, etc and that are relatively small. 
  • Can be lots of extra work to finish. 

I've also made embroidered pieces into bags, tissue holders, and potpourri sachets. They all have the "can be lots of extra work to finish" disadvantage. Any other ideas?
How many unfinished items do you have hidden away?

Wednesday, November 18, 2015

Embroidery class - year 2 - fine needlework - Madeira work

A while ago I blogged about the smocking component of the fine needlework module of the Embroiderers' Guild course, saying that I didn't want to write about the Madeira work until I'd finished the assigned piece.

Isn't #FinishItFriday useful? Not sure how many more years I'd have left it to languish otherwise. Oops.
The finally finished hand towel.
This project involved doing a gorgeous pin tuck hem on the two long sides and a coloured overlay with pin tuck detail on one short side
Close up of the pin tuck hems
a pigeonhole scallop on the other short side
The scallops were extremely hard to keep even.
and a shadow work design in the centre.
Close up of the shadow work design.
The design is worked in herringbone stitch so the dense stitches on the reverse create a "shadow" on the right side. There are also three small eyelets.  

I'm glad to finally have this finished and be able to show it off. This is the last of the embroidery course posts I'll be making, as I never collected my canvaswork assignments and I didn't do the goldwork module before I dropped out due to pregnancy exhaustion. I have looked into going back to complete the course but they've changed the schedule so the two modules I didn't complete are now in two different years. Still, I really want to find a way to finish, so maybe in a year or so when N. is older. 

Tuesday, February 10, 2015

Busy, busy

This week's finishes.
Madeira work hand towel from second year embroidery class: finished.

First attempt at a "pretty" nappy cover: finished.

Free reindeer ornament kit: finished.

Too small blue hat I abandoned to make a fitting one: finished.

Calico mockup of shorts to test bigger size: finally finished. And tested.

Not a bad week, really. More detail on the towel and nappy cover to come.

Thursday, June 27, 2013

The Rogue Trader Cape - complete!

All of my normal crafting was put on hold this past two weeks because I had the looming deadline to get my husband's Rogue Trader Warhammer 40k cape finished before the final LARP game ever for this campaign. If it wasn't finished in time, it would never have been worn for its intended purpose... so the pressure was on!

I finished the embroidery quickly enough, although I decided to leave off the motto. The letters would have been too fiddly and I'm not sure it would have been completed in time.
The embroidery almost completed. 

It looks ok without the motto. 

The monocle was an panicky substitute - I'd hoped to be able to buy a gold coloured wire circle in a 2-dollar shop jewellery findings display, but could only find what I was looking for in silver. Eventually I used a gold finding I had lying around that was designed to be eyelet edging. The chain of the monocle is very fine crochet.
A close up of the skull's monocle. 
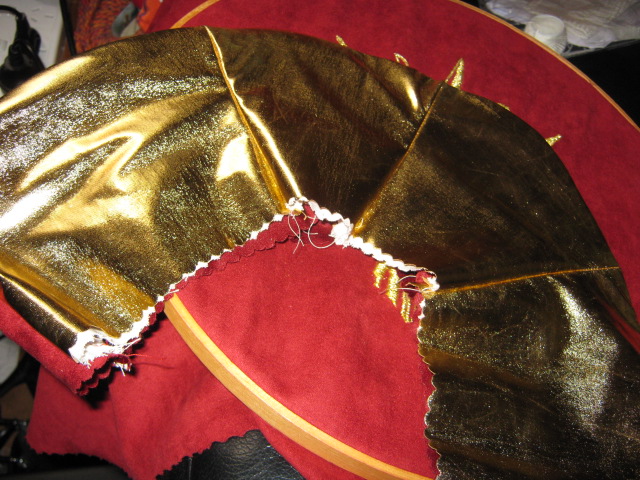
My husband and I went shopping to find a fabric for the lining. I was leaning towards pale gold satiny fabrics, but he went for a really metallic gold polyester stretch fabric. In the store I was thinking 'this is so gaudy and horrible' but in truth it was a much better match and fit in better with the intent of the cape and the overall costume. Rogue Trader crews are not known for their restraint.  You can see the lining most in the collar.
The collar under construction. 
I borrowed some millinery wire from my sister to go around the top and at intervals in the collar.
The front is decorated with some gold braid and some cheap skull earrings that another member of the crew found.
The skulls are earrings - $3! They give just the right finishing touch. 
I had hoped to get some better pictures of the cape in its entirety, but I decided I couldn't wait for the rain to finish and the light to improve.
The back of the cape. 

The front of the cape as a whole, showing the collar lining still,
and hints of the rest of the lining. 

I'm glad he got to wear it at least once. According to my spies at the event, the cape gathered a lot of comments, so I'm very happy.
You can read about the earlier stages of the cape and its embroidery here.

Tuesday, June 18, 2013

Embroidery class, year 2 - fine needlework - smocking

Our last completed topic in the guild's basic course was fine needlework. Year 2 has a very different feel to year 1, because we've had people move away, drop out, etc, and we are down to a group of six. Very cosy and yet more competitive!

Fine needlework is technically anything done with a tiny needle, but for the purposes of the class it covered two types of work: madeira work and smocking. This post will be about smocking, as thanks to the pregnancy exhaustion of first trimester, I didn't fully complete my madeira work project before handing it in, and I'd like it to be done before I photograph it for the blog!

I've been interested in smocking in the past, even to the extent of buying a book on it, but the amount of preparation you need to do to pleat the fabric had always seemed daunting. There are techniques you can use to smock fabric without pre-pleating, like counterchange smocking, but it works best on stripes or checks and still requires some fabric preparation in terms of marking it up.  So being given a pre-pleated sample piece for the purposes of the class was an ideal opportunity to try the stitching part without the initial time investment.

For our class and assignment folder we had to produce a smocking sampler, so just trying a variety of stitches.  I do enjoy the freedom of producing samplers but it does occasionally end up looking a bit messy.
I ended up with about a dozen different stitches and variations on stitches on my sampler, and I'm quite happy with it. I didn't get the room to try picture smocking, or smocking with buttonholes for a ribbon insertion - two techniques I liked the look of - but it was a still a good range to get a sense of what is involved in the technique.
The finished smocking sampler for the class. 
The basic stitches are quite easy. A lot of the elegance of smocking comes from how you combine them - so using the basic wave stitch in a variation that forms these lovely triangles, between which I've added tiny cable stitch florettes:
These triangles are made up of one basic stitch - but are so effective!
Or using a simple stem stitch to create a trailing vine which you then embellish:
An embellished trailing vine is so pretty - in a final project it might need backsmocking to keep it strong.
I really enjoyed playing with these smocking stitches. My reservations still stand though. There would be a LOT of preparation of fabric. But the final result does look beautiful. I suspect that only the recent news that the impending baby will be a boy has stopped me researching pleaters on ebay. After all, how much room would a pleater take up?